Sunday, December 20, 2009

Operation Sugar For Soldiers

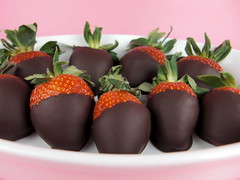
It's that time of year again to dust off our baking mitts and fire up the oven for some holiday giving! This is my third Christmas serving Operation Baking Gals and I am getting everyone involved in the sweet feeling of mixing, stirring, and heating-up at 350 to bake for our troops overseas. We cooked up and gathered 15 giving souls to bring their culinary best and bake as many cookies as they could to ship to the troops on December 16th. Knowing the calibre of people that I recruited for this job, I knew we would get a good selection of cookies cookin'...but I was brought to tears by the amount of sugar laden goodness that was brought forth by this effort. Weighing in at 80 pounds of cookies stuffed full into 5 boxes, we shipped more sugar than I could have ever imagined!! Wow.

The amazing soldier we sponsored this year is named Tyler Sutton. He is stationed in Afghanistan and while he is fighting for the marines day in and day out, it never ceases to amaze me that while we are lighting up our Christmas trees and unwrapping gifts from Santa, these soldiers are selflessly giving up their holidays at home to fight, stand up for and protect the land where we are building our snowmen. A cookie doesn't even begin to show our thanks, but we hope these homemade gifts of sweetness can bring a touch of home to all the soldiers on Tyler's base this holiday season. They are the true heros of Christmas, and we honor them with all our hearts.

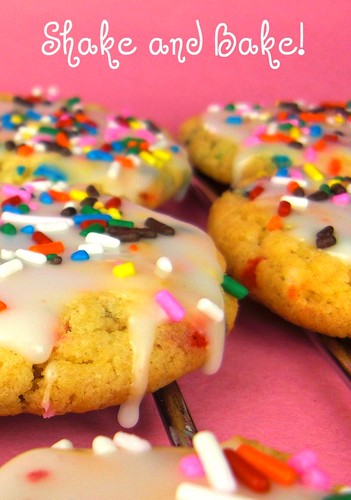
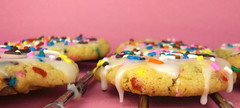
Birthday Cake Cookies

Ingredients 
1 box of vanilla cake mix (any kind with pudding in the mix)
1 teaspoon baking powder
2 eggs
1/2 cup vegetable oil
1/2-1 cup rainbow sprinkles (add as much as you desire)
FROSTING:
1-2 cups of powdered sugar
Juice of 1/2 a lemon
Milk (add to achieve smooth consistency) 
Rainbow sprinkles

Recipe
1) Preheat oven to 350 degrees
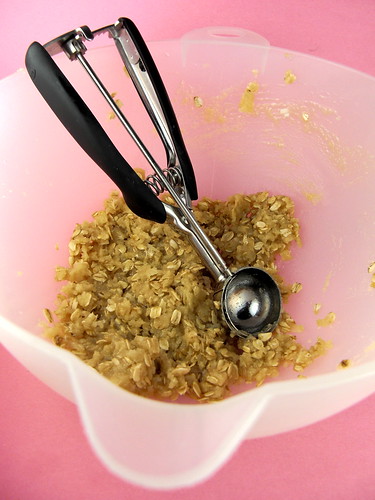
2) In a large bowl, mix together cake mix and baking powder
3) Add eggs and oil - mix until blended
4) Stir in rainbow sprinkles (try not to over mix the batter)
5) Using a medium sized ice cream scoop, drop onto baking sheet lined with parchment paper
6) Bake for 9 minutes (they will look underdone, but take them out and let them cool on the pan for 5 minutes)
7) Remove from pan and let them finish setting on a cooling rack
FROSTING:
8) While cookies are cooling, mixed powdered sugar with the juice of 1/2 a lemon
9) Add milk to mixture until frosting reaches a smooth consistency
10) Drizzle over cool cookies and top with remaining rainbow sprinkles

Sunday, September 27, 2009

La La Lemon Bars

Nothing is better for an end of summer shindig than the sweet and zesty taste of fresh baked lemon bars. They capture the refreshing zest of a hot summer day and the tart lip puckering goodness of a chilly fall to come.

Lemon bars are usually quite a long task...create the shortbread crust, hand squeeze lemons to create the curd and bake it with the hopes that the top doesn't spilt open like a poorly baked cheese cake...it can take hours, but the result is always the reward. However, when I wanted to bake up lemon bars recently for a party that was taking place only hours away, I knew that I had to speed up the process somehow. So, I put together a fast bake curd of sour lemons, zesty rind and a crust so buttery and yummy one would never know the difference between these quick bake bars and my usual treat that could take hours to tame. 

The result was a burst of tart lemon and a cake like shortbread that had everyone licking their fingers and thinking about seconds.

Ingredients
Crust:
1 cup butter (softened)
1/2 cup sugar
2 cups all purpose flour
pinch of salt

Filling:
4 eggs
1 1/2 cups sugar (less if you want the bars more tart)
1/3 cup flour
3/4 cup lemon juice (fresh squeezed - about 4 lemons)
Grated rind of 2 lemons

Recipe
1. Preheat oven to 350 degrees
2. In a medium bowl, create the crust by combining softened butter, sugar, flour and salt.
3. Mix until combined (using your hands works great to really get the butter mixed in with the flour!) and press into the bottom of a 9x13 inch pan
4. Bake crust for apx. 20 minutes or until golden brown - when you remove crust from the oven, allow to cool before adding filling
5. To begin making the lemon filling, whisk together the 1 1/2 cups of sugar and 1/3 cup flour
6. When the flour and sugar are combined, whisk in eggs, lemon juice and rinds
7. Pour over cooled crust and place back in the oven for 25 minutes - bars will firm as the cool
8. Once cool, dust top of lemon bars with powdered sugar 
9. Devour the lemon goodness!

Monday, July 6, 2009

Independence Berry Cobbler


What comes in a close second to BBQ and fireworks on the 4th of July? Dessert of course! No Independence Day shindig is complete without bellies filled with the tastiest food and smiles on everyones faces. That is why there is no better way to end your meal than with the colorful burst of a berry cobbler. This dessert is filled with natures own red and blue berries and all you have to do is add the white with some vanilla ice cream plopped on top of the 'just out of the oven' hot cobbler. Nothing says independence better than American farm gown berries in the colors of our flag, straight from the ground and right into our mouths.

And when the sparklers burn out...there's always leftovers!

Ingredients*
Filling:
3 pints of blueberries
1 pint blackberries
16 oz. package strawberries
3 peaches, peeled and sliced
2/3 cup granulated sugar
2 1/2 tablespoons corn starch
1 lemon (juiced)
1/8 teaspoon salt

Topping:
4.5 ounces flour (apx. 1 cup)
1/4 cup granulated sugar
2 teaspoons baking powder
1/8 teaspoon salt
6 tablespoons chilled butter (cut into small pieces)
1/2 cup half and half
3 tablespoons raw sugar
1 tablespoon of egg white

1. Preheat over to 350 degrees
Prepare filling: 
2. In 13x9 baking dish coated with cooking spray, combine blueberries, blackberries, strawberries and peaches
3. In separate bowl, combine the remaining ingredients for filling - 2/3 cup sugar, 2 1/2 tablespoons corn starch, 1/8 teaspoon salt - pour over fruit and toss with hands
4. Squeeze the juice of one lemon over filling mixture
Prepare topping: 
5. In a medium bowl, combine flour, 1/4 cup sugar, 2 tablespoon cornstarch, baking powder and salt - stir
6. Cut butter into flour mixture with a pastry blender or a knife and fork until it resembles corse meal
7. Add half and half and gently kneed dough until just moistened 
8. Drop dough by spoonfuls over the top of the fruit filling mixture, making sure to evenly space the dough
9. Combine raw sugar and egg white - sprinkle over the top
10. Bake at 350 for 50-60 minutes or until the topping is browned
11. Let stand 10 minutes and serve with vanilla ice cream 

*inspired by a recipe from Cooking Light Magazine

Tuesday, May 12, 2009

Anzac Biscuits

This week I am bringing you a very special recipe, given to me by my future father-in-law, that is full of sugar, stories and sweetness. Being a fellow craftsman in the kitchen I knew his recipe would be a keeper, but what I didn't know was that the story behind these cookies would be a recipe of wisdom in itself.

The Anzac biscuit might be a mystery to us Americans, but it's history to those with roots in Australia and New Zealand. This treat dates back to 1915 when the wives of soldiers in World War I made these cookies for their husbands to take on the road with them for sustenance (to read more about the meaning of Anzac Day and the story behind these treats, click here). What once started out as simple biscuit whose only function was a long shelf life, has now crossed generations to remain a sweet staple that not only tastes good but also delivers a piece of the past with every crunchy bite.

This biscuit is chock full of everything we love in the average cookie - oatmeal, coconut, butter and sugar - so read up, bake up and eat up this special new treat.

Ingredients
1 cup rolled oats (not the instant variety)
1 cup flour
1 cup sugar
3/4 cup coconut
1 tablespoon golden syrup (this ingredient is a bit hard to find...you can check your local grocery, order it over the internet or substitute it with light corn syrup and molasses in a 2 to 1 ratio)
1/2 cup butter
2 tablespoons boiling water
1 teaspoon baking soda

Recipe
1. Preheat oven to 300 degrees
1. In a large bowl, mix oats, flour, sugar and coconut together - set aside
2. In a small sauce pan, melt butter and golden syrup together
3. While the butter mixture is melting, mix together boiling water and baking soda in a separate bowl
4. When butter mixture is melted, add the baking soda mixture and stir
5. Combine wet mixture with the dry ingredients by slowly pouring over the top of the dry mixture
6. Stir together with fork
7. Drop rounded tablespoons of dough onto greased or parchment lined cookie sheets about two inches apart (cookies will spread almost flat)
8. Bake in oven at 300 degrees for 15-20 minutes
9. Cool on tray for a few minutes, then remove to cooling racks until transferring to air tight containers

Tuesday, April 14, 2009

Belated Bunny Easter Cupcakes!

When all the painted eggs have been found and eaten and the only thing left is half empty box of Peeps, all you need is a good batch of Easter themed cupcakes to keep the spirit stretched out just a few days longer.

This year, my family decided to have our big Easter celebration one day late...and who wouldn't want an extra day of celebration! I knew that we all secretly wanted to share in the sweets, festivities and bunny themed everything for just one more day. To be able to crack those plastic eggs, revealing the secrets inside and wearing our perfectly pink bunny ears just one more hour was so worth it. Celebrating Easter on a Monday to us, just meant we had a whole 24 hours of additional bunny time, and for my family, that is something to celebrate!

The evening began at my aunts house where we gathered for champagne, hugs, food, and most of all, dessert. Easter is one of those special holidays centered almost entirely around sweets and I knew I had to make a holiday themed cupcake that would knock the whiskers right off the Easter bunny! So, I set to work in my kitchen whipping up a magical blend of vanilla, coconut and leftover Peeps.

These cupcakes may look like a decorators dream, but they are so easy to make. Simply whip up a batch of your favorite vanilla cupcakes and buttercream frosting. While the cupcakes are baking, toss shredded coconut and green food coloring into a Ziploc bag and shake away! Once you frost the cooled cupcakes with the fresh batch of buttercream, simply press the green colored coconut onto the surface and top with your favorite themed Peep. 

So easy a bunny could do it!

Tuesday, March 24, 2009

The Truth About Nutmeg...

If there is one thing I have learned along my journey of baking, it is that freshly ground nutmeg is king and anything less is just a waste of culinary goodness. It will give your cakes, breads, and puddings a taste that leaves your guests wondering "what is that?!".  So go ahead, soak up the compliments of your secret ingredient and read on to find out why a little extra elbow grease will lead you to some beautiful baking.

As with most herbs and spices, fresh always reigns supreme. However, I am a realist here too and know that a) fresh ingredients are more expensive and b) you never actually end up using them all, thus wasting most of what you bought in the first place. Also, fresh herbs and spices always mean a little more work than just dipping into that small glass jar. That is why, in reality, I am with you on the dried, jarred ingredients...that is except nutmeg!

The joy of nutmeg is that when you buy it whole, the "seeds" actually come in a jar (similar to very large nuts). This means that there is no expiration date and no worries about not using up all that you paid for. The whole nutmeg can be pulled out as needed and gently grated on a microplane zester to add the greatest depth to all your dishes and any remaining seed that goes unused can simply be placed back in the jar! 

The flavor compared to jarred nutmeg is worlds away. This is because the essential oils contained in the whole seeds dry out in pre-ground nutmeg and little real flavor is left, leaving much to be desired in your dessert. I can promise you that once you begin to grate the seeds and start to smell these flavorful oils coming out of the freshly ground nutmeg, you will be converted.
So go ahead, kick your spices up a notch. Once you grind, you'll never go back!

Thursday, February 26, 2009

Operation Chocolate Chip Cookies

This month of Operation Baking Gals fell right around the heartfelt day of Valentines and Team KelseyKakes took full advantage of sending all our love to the troops overseas. I had such a wonderful group this month stretching all the way from Alaska to New York City...that's a lot of baking mileage! These chefs went above and beyond for our sponsored troop of the month, Bryan Tull. 

SGT Tull is a broadcast journalist in the Army Reserves. His unit's primary mission is to work directly with members of the international media who visit Iraq to get the real story for audiences around the world. His unit also has a daily blog - Blogs Over Baghdad - that I encourage everyone to read, it will truly touch your heart. His job of maintaining the integrity of journalism is such an important one, as we all know that the information we have access to is a priceless tool for understanding what is really happening in our world. He is protecting our freedom of press and freedom of speech...and for that, we bake!

I was so inspired by SGT Tull and caught up in the moment of Valentines, that I decided what better a treat than to bake up the largest, most yummy batch of my famous chocolate chip cookies...with a lovely twist of red and white M&M's to replace the chocolate chips of course! These cookies are perfect for shipping to a troop or a crush because they contain a secret ingredient of instant vanilla pudding. Why pudding mix you ask? Well, adding instant pudding mix to your cookie dough prevents the delicious bites from getting stale and hard during shipping. These cookies will stay soft for weeks on end and remain perfect with every nibble to come.

Chocolate Chip Pudding Cookies


Ingredients
2 1/4 cup flour
1 teaspoon baking soda
1 cup butter (at room temperature)
3/4 cup packed brown sugar
1/4 cup white sugar
1 package (3.4 oz.) instant pudding (I like vanilla)
2 eggs
1 tablespoon vanilla extract
2 cups semi-sweet chocolate chips (I used valentines M&M's for this recipe)
1 cup chopped walnuts (optional)

Recipe
1. Preheat oven to 350 degrees
2. In a medium bowl, sift together flour and baking soda - set aside
3. Using a stand mixer (or similar) cream together the butter, brown sugar and white sugar for about 2-3 minutes
4. Beat instant pudding mix 
5. Gradually stir in eggs and vanilla 
6. With the mixer on low, slowly add the flour mixture to the wet ingredients and blend until just combined
7. Using a spatula, hand stir in chocolate chips and nuts
8. Drop cookies by rounded spoonful on baking sheet lined with parchment (or an ungreased cookie sheet)
9. Bake for 10-12 minutes...they will look undone, but set up once removed from the oven

*TIP: You can really make these cookies you own by changing the pudding mix flavor or your add-in ingredients. Have fun with it! 

Sunday, February 15, 2009

Love is in the Air

Honing in on the latest trend of "staycations", my fiance and I decided to put on our PJ's and make valentines dinner at home! Not quite willing to sacrifice the sweet tastes of a great restaurant, I set off to begin the menu planning. After all, this was my chance to bring romance into the kitchen and add a little bit of loving flare to everything I touched.

We started the evening with a romantic roll...heart shaped biscuits! These are very easy to make and if you can keep a secret, your guests will even think they are homemade. 

First, start with a store bought canister of buttermilk biscuits (I like the Pillsbury reduced fat variety), pop open the casing and separate each biscuit out onto your cutting board. Then, using a small heart shaped cookie cutter, go ahead and press into each biscuit and pop out the heart shaped dough. Place the little hearts on a well greased cookie sheet and bake as directed...easy!

Next up, my honey was in charge of the main meal cooking (since I am a baker by nature and a sorry excuse for a dinner chef!) and whipped up his seductive staple: roast chicken and root vegetables...yum. I won't spill his trade secrets to the perfectly crisp skin and utterly scrumptious veggies with rosemary essence, but you can trust me that this course was oh so good.

As the evening dwindled on and we let our indulgent tummy's settle a bit, I smiled knowing that I had saved the best for last, dessert.  When I was thinking about what the most romantic sweet could be for our finale, I had one dish that seemed just right - chocolate covered strawberries. Not only are these incredibly easy, but they are also incredibly lovely when paired with a glass of bubbling champagne.


What is this easy trick of a dessert you ask? Shhh, its all in your microwave! Simply buy your favorite melting chocolate (I like to use Bakers semi-sweet because the bitterness of the chocolate is the perfect balance to a nice ripe strawberry) and place it in the microwave for 30 seconds at a time, stirring in between until melted. Once your chocolate is nice and smooth, take your washed and fully dried strawberries and dunk away, making sure to brush off excess chocolate on the side of the bowl before placing on a cookie sheet lined with foil. After you have dipped all your strawberries, place them in the refrigerator until set (about 30 minutes). If you feel like going the extra mile, go ahead and melt some white chocolate too and drizzle over your chocolate after it has set! The are so delicious, so easy, and so romantic that you are sure to make your loved one smile with sweet delight.

So go ahead and order some romance in! It's not hard, easy even, to bring everything you love about date night right to your living room. As they say...home is where the heart is, and I agree!

Friday, February 13, 2009

Super Bowl Cupcakes

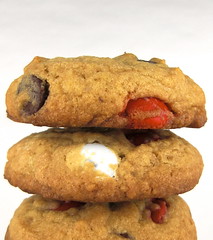
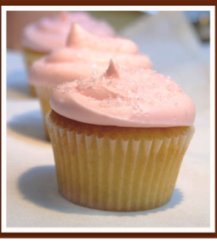
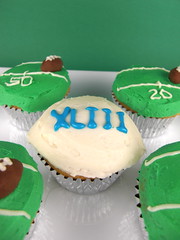
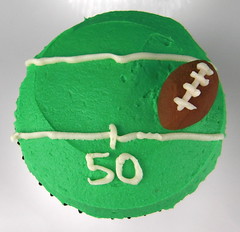
These cupcakes speak for themselves...touchdown in the sugar zone!

While most people count down for the Super Bowl with six packs and a bowl of wings, KelseyKakes hits the kitchen loaded with football fueled inspiration. Now I must admit, I am no expert in the sporting arena, but I am an expert of my oven and when Haydn and I decided to throw a Super Bowl party I knew exactly where I would be useful...in the kitchen! With the seven layer dip down and some pizza on order, I set to the bigger task at hand - cupcakes themed to match the biggest day of football all year. 

Seeing as we were not rooting for a particular team this year, I decided that these cute little cakes would get some masculine love with frosting colored like grass and yard lines thinly piped with white buttercream frosting. But what would a Super Bowl cupcake be without the footballs?! These small pieces were made by hand rolling chocolate and adding laces stitched with frosting. Stick them on the 40 yard line and you've got yourself a first down!
So go ahead and get baking, there is no event to big or too small, too girly or too manly, cupcakes take the cake no matter what the occasion!

*TIP - to pipe on the frosting evenly and thinly, simply cut a small hole in the bottom tip of a Ziploc bag filled with frosting and pipe away!*

Wednesday, January 28, 2009

She's One Tough Cookie!

There really is some goodness in giving, and I don't mean the confectionery kind. As you know, each month I work with Operation Baking Gals to organize women from all over the country who fire up their ovens to bake, pack and ship goodies to our troops overseas. I have found unbelievable joy in this process and each month it gets even bigger and better with January increasing the momentum. That's because this month I had the utter joy of being honored by my company (Grey New York) as Giver of the Month for my baking effort with OBG. But the true icing on the cake was the full size posters were hung on every one of our 38 floors raising awareness and praise for the great work we do.

WOW, what an honor.

You see, December was our holiday round of baking so I knew we had to go above and beyond our own personal call of duty to really make this holiday away from home as comforting as we could for our soldiers...this meant more cookies than we ever thought possible! When faced with this mission I knew I had to recruit even more than my current on-line network of chefs, so I set out to transform my companies annual cookie exchange into a major bake session for the troops. And boy did they bake. In total Team KelseyKakes sent a whopping 85 pounds of cookies, bars and treats all the way across the world and into the hands of the men and women who we should thank most during the holidays. They work to keep us safe and in turn its our job to keep them well loved, plenty fed, and endlessly supported.

I feel so blessed to be recognized by my company for our efforts on behalf of Operation Baking Gals and a BIG thanks goes out to all the bakers who make Team KelseyKakes such a sweet success each and every month, it is truly humbling.

*To find out how to get involved in Operation Baking Gals please visit www.bakinggals.com or feel free to email me and join team KelseyKakes at kelseypm@hotmail.com*

Sunday, January 18, 2009

Sweetness Down Under

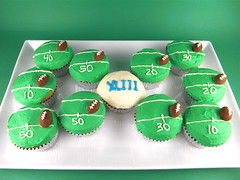
The cupcake craze has headed down south...to Australia that is!

I recently had the luxury of heading to the magical world of Sydney to spend the holidays with my fiances family and soak up a little summertime Christmas. But I knew that this was going to be so much more than a vacation, I was going to use this trip to dig into the sugar coated culinary scene of the Southern Hemisphere.

Packed and ready to go, I armed myself with the best research on cookies, rolls and cupcakes - Australian style - and boy was I in for a journey. The biggest surprise of all was that the now famous little New York cupcake had made its mark on the downtown Sydney landscape. Amped with anticipation to study, critique and taste every cupcake I could get my hand on, I set off with an empty stomach and an open wallet.


Cupcakes on Pitt...
Now I have to admit, I was really looking forward to digging into the frosting coated world of Cupcakes on Pitt. I had read about the famous little treats all over the Australian blogosphere and I was counting down the days until one of them hit my taste buds. Walking with anticipation, I knew when we were close by the familiar 'cupcake line-up' of people. Growing more eager by the second we rounded the corner and in the front door...and what did I see? No wait...this cant actually be the bakery and these can't actually be the size of the cupcakes?! The interior was less of a cozy bakery and more of a sweatshop for sweet treats, with no oven in sight (unless you count the microwave in the back left corner). It was cold, and rushed, and very mass produced. I was losing hope for my Australian cupcake shop, though I kept the faith as I purchased a tiny little vanilla cupcake...surely they would make up for their lack of bakery charm and micro-cupcakes with flavor, pure flavor. Nope. The cake was dry and the frosting tasted like pure butter. It might have been a waste of one cupcake, but not to fear! We were on to the next bakery in 10 minutes flat!


The Cupcake Bakery...
Now this is a cupcake shop! I walked in to The Cupcake Bakery and immediately felt the familiar cozy feeling of light pinks, chocolate browns and the sweet sight of big, fluffy, delicious, pastel colored cupcakes. YUM. I ran to the counter anxious to clear my memory of the previous cupcake let down and I could feel it, I just knew, that this was going to be one amazingly tasty cupcake. Sometimes sweets are funny like that, you can tell just by looking at them. Sure enough, my eyes were as right as my stomach...these were good, really good. And best of all they were cute, and isn't that why we all love a cupcake?


The Neighborhood Bakery...
We cannot leave Australia without a special mention of a little local bakery in Manly that cooks all kinds of baked goods daily. We walked by this shop many times during our visit but this day was different. This day just happened to be my birthday and it also happened to be the day that a distant phone call came through the line telling me my grandmother had just passed away. I was sad. I hurt. I did know what to do, or how to feel.
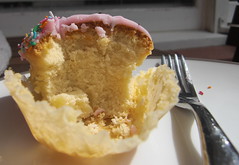
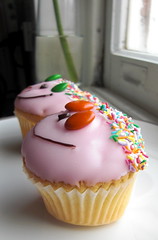
As we walked passed the very traditional bakery window, Haydn's hand holding tightly to my smaller and far more fragile one, I spotted an incredibly homemade looking cupcake. It wasn't fancy, it didn't even have fluffy frosting, but it made me smile. Cupcakes do that, they add a little bit of light and laughter in even the darkest tunnel. I stood staring in the window and suddenly I knew this would be my special birthday cake...tiny, imperfect and yet completely wonderful. We bought two, one for each of us and strolled the short walk back home. Sitting down we took them out of their crinkled paper wrapper, one by one, and toasted...to the future, to us, to births and to deaths, to the cycle of life and to little cupcakes who's only gift is to keep on giving.

**A little bite of sweetness in memory of Goose**