Saturday, September 27, 2008

Cinnamon-Sugar Lavash Crackers

The September Daring Bakers challenge was a first for me as a newly appointed member of the monthly baking group...and what a first challenge it was. Straying away from the typical sweet tooth of challenges past, this month we were given the quest to make lavash crackers from our hosts Natalie of Gluten a Go Go and Shel from Musings from the Fishbowl (you can find their base lavish challenge recipe here). Now before you think that I have strayed from my sugar roots, I will have you know that I took their challenge and made it sweet! That's right, sweet, as in cinnamon-sugar crackers. And while they did taste yummy, I have to admit that I do not have a talent bone in my body for anything that has to do with yeast or bread dough. These were hard, seriously, and with the yeast I felt like I had no control. But, since the was my first challenge I decided not to get upset at not reaching perfection and to just enjoy the learning of kneading, rising and rolling!
But that's not all folks, they also gave us a second challenge this month which was a recipe all to our own...to create a dip that would compliment our delicious crackers. Sounds easy right? Wrong. This dip not only had to be tasty, but it also had to be vegan and gluten-free! Okay, okay, how hard can that be you ask? Well, when dipping in the sweet world, not much is made without butter and dairy. So, my first instinct was to go right for the honey jar. Sure, I couldn't make honey butter, but I knew I could make something lip smacking good, and I would have, only I just found out honey isn't vegan...ugh! 
After a few cups of coffee and a good long brainstorm, I had it. I would make raisin chutney. No animals, no wheat, just sweet raisins were involved here. So without further adieu, here is my raisin chutney recipe that was the perfect partner to my cinnamon sweet crackers.

Ingredients 
1 cup of raisins (soaked in hot water for 15 minutes before use)
2 tablespoons of hot water
1/4 teaspoon of salt
1/4 teaspoon of cinnamon
1/2 teaspoon of sugar (or more to taste)
1/2 of a fresh lemon juiced (apx. 2 tablespoons)

Recipe
1. After raisins have been soaked in hot water for 15 minutes, drain
2. In a blender, combine all ingredients adding lemon juice last
3. Pulse until the ingredients have come together and the mixture has formed a course consistency
4. Dip away!

Friday, September 26, 2008

Cupcakes, friends and rain...oh my!

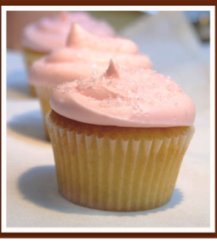
As our end of summer BBQ was showered down upon by the chily city rain, I thought what better a way to brighten up the bash than a good oldfashioned cupcake covered in sparkling sprinkles. With determination, I set out in the storm to buy my goods and hunker down in my little kitchen for what would be a favorite weekend afternoon in my book...cupcake frosting. Yeah, the mixing part, the baking part and the licking the bowls part is pretty fun, but the frosting part takes the cake - pun intended!

I dont know if its the delecate nature of the sugar mixed goodness, or the endless decorating possibilities that it gives you, but frosting is my numero uno. It's the frosting that perfects the whole cake, and for me, its all about the buttercream. I have tried a few different variations on this tried and true recipe, even a merange buttercream (which is the what they use at cafes like Buttercup Bakery and Crumbs), but I always end up coming back to the basic: Confectioners Sugar Buttercream. This type of frosting is spread over the likes of the famous Sprinkles and Magnolia Bakery and I favor it as my topping to be. Everyone has a different oppinion though and cupcake connesours are a plenty out there...so whip up a batch or two of this vanilla buttercream frosting and try for yourself...I bet you'll find this recipe actually tastes better than your $4 treat down the street!

Ingredients
1 cup butter (softened to room temp)
3 1/2 cups confectioners sugar
1 tsp milk
1 tsp vanilla extract
1/8 tsp salt 

Recipe
1. In a bowl, combine butter and salt. Beat until blended, light and fluffy (I use the whisk attachment on my KitchenAid mixer)
2. Gradually add sugar until incorporated (stopping occasionally to scrap the sides of the bowl)
3. Add milk, vanilla and beat for and additional 3-5 minutes or until smooth and creamy (don't over mix and add too much air, frosting should be thick and creamy)
4. Grab you piping bag and go crazy, or just roll the edges in sprinkles like I did. Its such a dramatic effect with little effort!

*Something to remember - you MUST have your butter softened or you will get lumpy frosting and no one smiles at lumpy frosting

Thursday, September 18, 2008

Cupcakes 101

If study halls were made of sugar...and homework was glazed in liquid fondant and chocolate ganache...you would find yourself right next to me in my latest educational endeavor at the Institute of Culinary Education, Cupcakes Workshop 1.

*Getting Ready!*

Now, as much as I would like to say that I am a full time student in frosting and flour, this was actually a recreational class taught in the evenings by the endlessly talented Melanie Underwood. She spends the 5 hours of sweetness teaching you to whip your way to successful butter cake batter, beat a better buttercream and pipe a fancier frosting. The class runs the gamut of the sugar obsessed, from professional bakers to inexperienced friends who just came along for the ride, there is a place for every baker in this kitchen.

As the clock struck 6 pm, we were off and running. Melanie began the class with a few explanations of how our recipes for the evening would be concocted and delivered some must share tips in the process! Did you know that when you cream together your butter and sugar for a cake batter you should be mixing them for apx. 10 minutes?! Here I was all these years mixing for two minutes max...mostly because I was impatient to cook my creation, but more so that I just didn't understand the difference it makes...and wow, what a fluffier and smoother end product! You must now give yourself that extra time...read a book, eat some frosting, just do it.

Another tip that I am dying to share is all about the flour (you will thank me for this one, and even get back some of the time you lost during creaming)! Instead of slowly scooping bit by bit of your dry ingredients into the bowl (ho hum), you should actually be dumping the whole thing in at once. That's right, just stop your machine and dump it right on in. The time you save doing this is actually the time you save the gluten from over producing and giving you gummy cupcakes, yuck! *Just make sure you don't turn your mixer on high right out of the shoot or you will be wearing it!

Other quick tips...then onto the cupcakes: 1) once you mix the batter, its okay for it to sit out for a little while if you are baking in batches...it doesn't all need to be poured at once. 2) crack all your eggs into a bowl and beat them before adding to the batter (just use your eye to add "one" egg at a time) 3) speaking of cracking, do you know you get a better break if you crack right on the counter surface vs. a bowl? 4) you can substitute out vanilla for any flavor imaginable in you basic vanilla cake and frosting, even alcohol (just be conscious of the ratios). Armed with all the tips and tools I needed, I was off to the races. Let the baking begin!

A snowball of sugar, yum!

Fresh edible flowers really make these pop!

Ohhh, Ahhh...

Saturday, September 13, 2008

Sunflower Sunshine Cookies


Who knew sunflower butter could be so, YUM?
I was  a bit skeptical about giving this cookie of an experiment a try, but in the constant pursuit of a "better for you" treat I was lead down a very different path.  You see, these cookies stem from what I call 6 degrees of 'inspiration' (from my cookie that is)!
It all started with my girlfriend who is robbed of the deliciousness that is anything and everything baked with flour or gluten, so I knew these had to be gluten free.  This my friends, is a serious task. In my baking heart, I knew I was not yet ready to get involved with the alternative flour mixing magic that is a safe, gluten free blend...so I decided my little treat had to simply not include gluten at all. Well, if you have tried this before, you know that it pretty much leaves you with peanut butter cookies and macaroons.  So, armed with my basic peanut butter cookie recipe and a new carton of eggs, I was set to dig in to my Kitchen Aid mixer right when I arrived home from work.

But, where's the 6 degree twist you ask? Here it comes...

As I was ready to leave the office, groceries in tow, a girlfriend of mine was arriving back from the allergist..."allergic to peanuts". Seeing the desperate heartache in here eyes I knew I had to cheer her up through sugar on her tastebuds ASAP. My mission: these cookies now had to be nut free too, but how? Cue sunflower butter!
Many more degrees of inspiration came from aisle 6 at the local Whole Foods and before I knew it I was cutting and creating at top speed. The end result was delicious if not magnificent.  Not to mention the ridiculous amount of nutritional benefits sunflower butter has to offer, who knew?! 
So here they are...a little good for you, a little bad, a little sweet, a little salty...'little' however, does not preclude their wondrous flavor.

Ingredients
2 cups sunflower butter (stirred)
2 cups light brown sugar (optional - 2 cups white sugar and add 1 tsp molasses)
2 eggs (beaten) 
1 teaspoon vanilla extract
Pinch of cinnamon
2 teaspoon baking soda
Pinch of salt
1 cup granulated sugar (on the side to roll dough in)

Recipe
1. Preheat oven to 350 degrees
2. In a mixing bowl, combine sunflower butter, sugar and beaten eggs until combined
3. Add vanilla, cinnamon, baking soda and salt
4. Mix well
5. Roll dough into 1 inch balls, and dip into granulated sugar
6. Place balls on foil/parchment paper lined baking sheet (if dough is too sticky, refrigerate for 30 minutes)
7. Using a fork, press balls slightly to make a classic crisscross pattern on the top
8. Bake for 9-10 minutes (until light brown)
9. Cool cookies on pan for 5 minutes before removing to cooling rack
10. Store in refrigerator, they will go bad if left at room temperature 
11. EAT!
*Makes 2 dozen