Thursday, December 4, 2008

Gluten-Free Cookies and Cream Cupcakes!

About once a month I am graced with the presence of my gluten-free goddess Sarah and each of these visits always includes a little bit of wheat-free wonderful. This trip was nothing different and before she even arrived we had decided that the whole day would be spent in my kitchen dawning aprons and oven mitts. As we already knew, the task would have to include some creativity as "gluten-free" is never an easy task to perfect on those pallets that crave the flour packed sweets that are usually generated from my kitchen (that would be our toughest critic and dessert lover, my fiance Haydn). We knew if we could get him to love our baked goods sans gluten, then we had perfected a job well done.

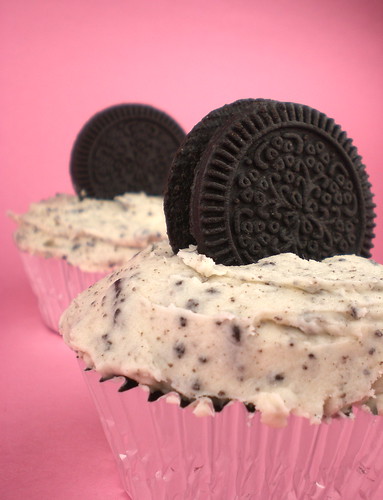
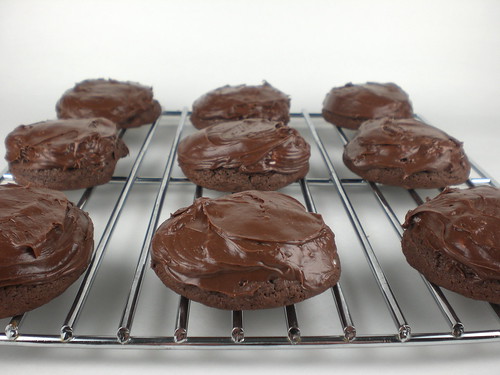
Off we went, armed with tapioca flour and xanthum gum, to my mixing bowl where we decided to go wild and create our own version of a cookies and cream cupcake. Using the basic gluten-free chocolate cupcake recipe from Vegan Cupcakes Take Over The World, we got the idea to throw in some crushed GF chocolate sandwich cookies that we found at Whole Foods into the batter for that extra sweet cocoa crunch. These baked up perfectly, but they were definitely missing the "cream" element that would seal the deal and kick up all the sweet flavor the batter had lost from lacking the gluten that a normal cupcake would have offered.

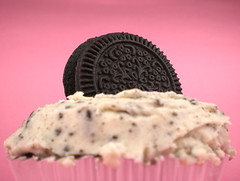
Thinking fast we knew we needed to work on the cream topping to pass our taste test. Using the same idea we had for the base, we got to crushing more cookies while mixing them into my basic buttercream frosting recipe and viola, we had the tastiest cookies and cream topping! It was only seconds before the icing was perfectly placed with an offset spatula and heading right into our hungry little tummies. Of course my gluten-free goddess loved them as we had just re-created a favorite that had been missing ever since her diagnosis with Celiac...but what about our toughest critic...did he think they were just as good as the original? Did they pass the test?

As they say, silence is golden...

Cookies & Buttercream Frosting Recipe
1 cup butter (softened to room temp)
3 1/2 cups confectioners sugar
1 tsp milk
1 tsp vanilla extract 1/8 tsp salt
1 cup crushed chocolate sandwich cookies (Oreos or a gluten free variety) 

1. In a bowl combine softened butter and salt. Beat until blended, light and fluffy using the whisk attachment on your mixer
2. Gradually add sugar until incorporated (stopping occasionally to scrap the sides of the bowl) - you may need a little more or a little less depending on you desired frosting thickness
3. Add milk, vanilla and beat for an additional 3-5 minutes or until smooth and creamy (don't over mix and add too much air...frosting should be thick and creamy)
4. Using a spatula mix in crushed cookies
5. Spread on cooled cupcakes and top with whole cookies for decoration!

Wednesday, December 3, 2008

Sour Cream Coffee Cake

Who doesn't love to start their morning off with cake? I still applaud the woman (or man!) who decided to put the word 'coffee' in front of 'cake' so that everyone could feel good about eating dessert for, well, breakfast.

Speaking of breakfast...my wonderful sister was throwing me an engagement brunch the other weekend and knowing my sister (who's KitchenAid mixer is for decoration purposes only and has no measuring cups...yes I know, I don't know how either), I knew I was on call for a delicious treat that was both sweet and rich as it was breakfast. Since the little things in life excite me, I set running with joy to the dessert/breakfast section of my cookbook. A few swift page turns later I landed on what I knew would not only fill our bellies, but would give us an excuse to eat dessert at 10 a.m - Sour Cream Coffee Cake.

Now, this coffee cake is not for the faint of heart. It is rich, dense and oh so filled with sugared topping that swirls magically throughout the center. This cake...I mean breakfast...will keep you going all day, if not make you go back for seconds at lunch time. Dig in with a fork, spoon or just pick it up and gobble it down. Either way you slice it, this coffee cake is down right delish!

Ingredients
BATTER:
1 cup butter
1 3 /4 cups white sugar
2 eggs
1 cup sour cream (I use reduced fat, but whole works fine too...just not non-fat!)
1/2 teaspoon vanilla extract
2 cups all-purpose flour
1 teaspoon baking powder
1/4 teaspoon baking soda
1/8 teaspoon salt
TOPPING & FILLING:
2/3 cup all-purpose flour
1 cup packed brown sugar
4 tablespoons melter butter
2 teaspoons ground cinnamon
Recipe
1. Heat oven to 350 degrees and grease a 9x13 inch baking pan
TOPPING & FILLING:
2. In a medium bowl prepare the filling and set aside: mix 2/3 cups flour, brown sugar, melted butter and cinnamon
BATTER:
3. In a small bowl combine 2 cups flour, baking powder, baking soda and salt - set aside
4. In another separate large bowl (or mixer), cream together butter and white sugar until light and fluffy (apx. 1-2 minutes)
5. Add in eggs, one at a time
6. Mix in sour cream and vanilla
7. Slowly add flour mixture until just combined
ASSEMBLY:
8. Pour half the batter into prepared pan
9. Sprinkle half of the topping mixture onto the cake batter
10. Spread the remaining batter over the filling and sprinkle with the rest of the topping mixture
11. Bake 35-40 minutes or until a tooth pick comes out clean (tip: tent the cake with foil for the last 20 minutes, it will keep the sugar topping from over browning)
**Make it your own: the center can be filled with whatever you crave...blueberries, apples, nuts, raisins, anything!

Monday, November 24, 2008

Operation Oatmeal Butterscotch Cookies

Operation Baking Gals round five was a November sensation. Woman from all over the US joined my team and came together, whisks in hand, to warm up their ovens in honor of our troop this month, Kevin Callen. Kevin is currently on his second service of duty in Iraq and was deployed on a few short days after his baby girl was born on September 15th. We were not only touched by Kevin's service in the marines, but by his endless dedication to his family and to the country we can all call home. In the Operation Baking Gals world, that is what we call a true hero.
It is needless say that we were truly inspired by Kevin this round and Team KelseyKakes really took off baking! We gathered around our cookbooks to make sure we sent over only the most heartfilled, home-inspired sweets that we could offer to our brave soldiers...and that counted for over 55 pounds of cookies this round! Wow.

Here is my personal batch of Oatmeal Butterscotch Cookies:

Ingredients
3/4 cup unsalted butter, softened to room temp
3/4 cup granulated sugar
3/4 cup packed brown sugar
2 eggs
1 teaspoon vanilla extract
1 1/4 cups all purpose flour (I like to use 1/2 whole wheat flour)
1 teaspoon baking soda
1/2 teaspoon ground cinnamon
1/2 teaspoon salt
3 cups of rolled oats (not the instant kind)
1 2/3 cup of butterscotch chips

Recipe
1. Heat over to 375 degrees
2. In a large bowl (or standing mixer), beat butter, sugar and brown sugar together until light and fluffy (apx. 2 minutes)
3. Add eggs and vanilla, beat well
4. In a separate bowl, mix together flour, baking soda, cinnamon and salt
5. Slowly add flour mixture to butter mixture, stir until blended
6. Stir in oats and butterscotch chips by hand
7. Drop by tablespoons about 2 inches apart onto ungreased or parchment lined cookie sheets
8. Bake at 375 for 10 minutes
9. Transfer to a wire rack to cool

It is an honor to host Operation Baking Gals each month, and it is even more awe inspiring to find myself increasingly touched and humbled by every round. My bakers out there are truley selfless women and each new month seems to bring on more team members, more cookies and more love and support that we then get to send across the ocean to our troops in Iraq.

I decided to be a part of Operation Baking Gals as a way to heal, gain strength and deal with the heartache of losing a best friend who lost his own life while stationed in Iraq...in turn I have found so much more than I could have ever asked for. I have found a therapy in people, in my oven and in friendships that exisit so selflessly in the support of others. I have found troops, from all over our country, that I get to share my love for baking along with the love for my country all in the same box. I have found hope, strength and frosting covered happiness. But most of all, I have found that if we can make one solider feel our support, our love and a little closer to home...if only for a day...then we have succeeded in a job well done.

As we enter round five, the Holiday Baking Round, I hope I get to share these feelings and simple joys with all of you. If you would like to join Team KelseyKakes in my surgar coated quest to support our troops, feel free to join my team here, or email me at kelseypm@hotmail.com.

Tuesday, November 4, 2008

Likety-Split Pumpkin Pie

Pumpkin fest 2009 has come and gone leaving in its tracks a few pieces of pumpkin sage butter ravioli, an unopened Smuttynose Octoberfest and a half eaten pan of the easiest, most scrumptious, fresh from the oven, pumpkin pie.

I must say that I am not a pie person. There is just too much at stake with a pie crust...cutting the butter into the flour, rolling the dough to the perfect thickness and the expectations of a crust so flaky, you must have recived the recipe from your great grandmother. Pie crust falls under the pastry column and pastries leave little room for a KelseyKakes like kitchen error. Now with that said, I don't bake pies...but I do eat them! So when I found this recipe for an easy (and fast!) pumpkin pie on the Pillsbury website using a store bought pie shell, I was hooked and ready to complete my entire pumpkiny inspired menu. Enjoy and bake up!

Thursday, October 30, 2008

Sugar Coated in Paris

Croissants, crapes, espresso, and chocolate. Bistros, leaves, love and autumn.

What better a place to eat and float your way through each minute of your day than Paris, France? I for one perused the streets of Paris spending all my time peeking in the rustic patisserie windows and nudging my head in the wooden doors just to take a sniff of the delacy and flavor that only a home baker could envy as much. That chocolate, those tarts, the pure indulgence of meranges that seem to peak higher than Everest. How do they do it?

There is a way with sweets in Paris, there is a love that is in every cut of cake and every flip of a crepe. Maybe its just me or the air in this romatic city, but they do things differently here. It's about beauty and flavor...without ever sacrificing either. Its the art, the form and the heart that you can feel on the tips of your taste buds in everything you touch.

It's delicious. It's beautiful. It's Paris in the fall time.

Friday, October 17, 2008

Chocolate Marshmallow Cookies!

Lets take a culinary adventure back to the delicious decade of 1990 and an obsession that was equally as mouthwatering as it was to-die-for tasty: chocolate marshmallow cookies and Valley River Mall. Most of you will not know Valley River Mall, but I bet you do remember the old cookie stands that were a regular fixture in the suburban shopping paradise...the cookies were big (so big) and our favorite was a chocolate comatose of rich cocoa, gooey marshmallows and a smothering of luscious, fluffy frosting.

Not only was this cookie experience so memorable because of the sugared goodness that I can still taste to this day, but more importantly because it was my sister's first introduction into why the world of baking is so much more that an Oreo. In our 7 year old world, these cookies were gold and our allowance was currency. My sister LOVED these and she I will credit as my inspiration in the quest at recreating the cookies from our childhood that have long been lost in shopping mall turnover.


Ingredients
1 box of chocolate cake mix (I like devils food)
1/2 cup of butter
2 eggs
1 tablespoon of pure vanilla
1 bag of large marshmallows (cut each marshmallow in half and set aside)
Chocolate frosting (you can make it or by it canned - one can will do for this whole recipe and its easy!)

Recipe
1. Preheat oven to 350 degrees
2. With an electric mixer, cream butter (apx. 2 minutes)
3. Add cake mix, eggs and vanilla - mix until blended
4. Drop by spoonful onto cookie sheet lined with parchment (I use a medium cookie scoop)
5. Bake @ 350 for 8- 9 minutes
6. Remove cookies from oven and quickly place 2-3 marshmallow halves sticky side down on top of the cookie
7. Place pan back in oven for 1 minute
8. Remove cookies again and use the back of a buttered spoon to lightly flatten and spread the melted marshmallow across the top of each cookie
9. Allow to cool and frost with the chocolate frosting, making sure to cover all the marshmallow
10. Eat, eat, and try to share :)

Sunday, October 5, 2008

Whose broad stripes and bright stars

Operation Baking Gals round three started off this month by going back to the basics - Rice Krispies Treats!

I Bet if you ask yourself what the first sweet treat was that you were allowed to whip up as a youngster, you might be right with me in remembering the simplistic perfection of mini-marshmallows, butter and Rice Krispies.  Though these might be the easiest culinary snack you will find on my blog, don't underestimate the smile power of these sugar packed treats...which is just why they made the perfect gift to send off to my soldier of the month, CPT Jackie Buzzard and her team, stationed in Iraq.

When baking for OBG's, my culinary outlook is a little different than my everyday relationship with my oven.  On a regular basis I am usually inventing, experimenting and letting my imagination freely flow into my KitchenAid mixer...but OBG's is no regular cookie exchange my friends. With each and every round our goal is to bring these troops a little closer to home, remind them of our kitchens and all the goodness that they remember coming out of it.  With that said, this month I decided to deliver the most basic (and most loved by all!) nostalgic American goodie with a little United States flare to boot.  Taking the traditional recipe from right off the box, I melted, stirred and stuck my way to the perfect rectangular bar of sweetened cereal goodness. Top that off with a little dunk into melted white chocolate dusted with red and blue sprinkles and we have the perfect build on your favorite Kellog's Rice Krispie Treat.


So from my lunch box to yours, dig in.

Ingredients
3 tablespoons of butter
4 cups of mini marshmallows (add 1 cup extra if you want marshmallow chunks in the end)
6 cups Rice Krispies
2 boxes of white dipping chocolate (or one bag of white chips)
Sprinkles of your choice

Recipe
1. In a large saucepan, melt butter over low heat
2. Add marshmallows and stir until completetly melted. Remove from heat (for extra whole marshmallow chunks, add the extra cup here)
3. Add Rice Krispies cereal and stir until coated
4. Using a buttered spatula, press mixture into a 13x9 inch pan coated in cooking spray
5. Once cool, cut into rectangles
6. In microwave, melt white chocolate according to package directions
7. Dip ends of Rice Krispie bars into melted chocolate
8. Sprinkle with desired coating and lay to set on foil coated in cooking spray (you might need to put these in the refrigerator to speed up the process)
9. EAT!

Saturday, September 27, 2008

Cinnamon-Sugar Lavash Crackers

The September Daring Bakers challenge was a first for me as a newly appointed member of the monthly baking group...and what a first challenge it was. Straying away from the typical sweet tooth of challenges past, this month we were given the quest to make lavash crackers from our hosts Natalie of Gluten a Go Go and Shel from Musings from the Fishbowl (you can find their base lavish challenge recipe here). Now before you think that I have strayed from my sugar roots, I will have you know that I took their challenge and made it sweet! That's right, sweet, as in cinnamon-sugar crackers. And while they did taste yummy, I have to admit that I do not have a talent bone in my body for anything that has to do with yeast or bread dough. These were hard, seriously, and with the yeast I felt like I had no control. But, since the was my first challenge I decided not to get upset at not reaching perfection and to just enjoy the learning of kneading, rising and rolling!
But that's not all folks, they also gave us a second challenge this month which was a recipe all to our own...to create a dip that would compliment our delicious crackers. Sounds easy right? Wrong. This dip not only had to be tasty, but it also had to be vegan and gluten-free! Okay, okay, how hard can that be you ask? Well, when dipping in the sweet world, not much is made without butter and dairy. So, my first instinct was to go right for the honey jar. Sure, I couldn't make honey butter, but I knew I could make something lip smacking good, and I would have, only I just found out honey isn't vegan...ugh! 
After a few cups of coffee and a good long brainstorm, I had it. I would make raisin chutney. No animals, no wheat, just sweet raisins were involved here. So without further adieu, here is my raisin chutney recipe that was the perfect partner to my cinnamon sweet crackers.

Ingredients 
1 cup of raisins (soaked in hot water for 15 minutes before use)
2 tablespoons of hot water
1/4 teaspoon of salt
1/4 teaspoon of cinnamon
1/2 teaspoon of sugar (or more to taste)
1/2 of a fresh lemon juiced (apx. 2 tablespoons)

Recipe
1. After raisins have been soaked in hot water for 15 minutes, drain
2. In a blender, combine all ingredients adding lemon juice last
3. Pulse until the ingredients have come together and the mixture has formed a course consistency
4. Dip away!

Friday, September 26, 2008

Cupcakes, friends and rain...oh my!

As our end of summer BBQ was showered down upon by the chily city rain, I thought what better a way to brighten up the bash than a good oldfashioned cupcake covered in sparkling sprinkles. With determination, I set out in the storm to buy my goods and hunker down in my little kitchen for what would be a favorite weekend afternoon in my book...cupcake frosting. Yeah, the mixing part, the baking part and the licking the bowls part is pretty fun, but the frosting part takes the cake - pun intended!

I dont know if its the delecate nature of the sugar mixed goodness, or the endless decorating possibilities that it gives you, but frosting is my numero uno. It's the frosting that perfects the whole cake, and for me, its all about the buttercream. I have tried a few different variations on this tried and true recipe, even a merange buttercream (which is the what they use at cafes like Buttercup Bakery and Crumbs), but I always end up coming back to the basic: Confectioners Sugar Buttercream. This type of frosting is spread over the likes of the famous Sprinkles and Magnolia Bakery and I favor it as my topping to be. Everyone has a different oppinion though and cupcake connesours are a plenty out there...so whip up a batch or two of this vanilla buttercream frosting and try for yourself...I bet you'll find this recipe actually tastes better than your $4 treat down the street!

Ingredients
1 cup butter (softened to room temp)
3 1/2 cups confectioners sugar
1 tsp milk
1 tsp vanilla extract
1/8 tsp salt 

Recipe
1. In a bowl, combine butter and salt. Beat until blended, light and fluffy (I use the whisk attachment on my KitchenAid mixer)
2. Gradually add sugar until incorporated (stopping occasionally to scrap the sides of the bowl)
3. Add milk, vanilla and beat for and additional 3-5 minutes or until smooth and creamy (don't over mix and add too much air, frosting should be thick and creamy)
4. Grab you piping bag and go crazy, or just roll the edges in sprinkles like I did. Its such a dramatic effect with little effort!

*Something to remember - you MUST have your butter softened or you will get lumpy frosting and no one smiles at lumpy frosting

Thursday, September 18, 2008

Cupcakes 101

If study halls were made of sugar...and homework was glazed in liquid fondant and chocolate ganache...you would find yourself right next to me in my latest educational endeavor at the Institute of Culinary Education, Cupcakes Workshop 1.

*Getting Ready!*

Now, as much as I would like to say that I am a full time student in frosting and flour, this was actually a recreational class taught in the evenings by the endlessly talented Melanie Underwood. She spends the 5 hours of sweetness teaching you to whip your way to successful butter cake batter, beat a better buttercream and pipe a fancier frosting. The class runs the gamut of the sugar obsessed, from professional bakers to inexperienced friends who just came along for the ride, there is a place for every baker in this kitchen.

As the clock struck 6 pm, we were off and running. Melanie began the class with a few explanations of how our recipes for the evening would be concocted and delivered some must share tips in the process! Did you know that when you cream together your butter and sugar for a cake batter you should be mixing them for apx. 10 minutes?! Here I was all these years mixing for two minutes max...mostly because I was impatient to cook my creation, but more so that I just didn't understand the difference it makes...and wow, what a fluffier and smoother end product! You must now give yourself that extra time...read a book, eat some frosting, just do it.

Another tip that I am dying to share is all about the flour (you will thank me for this one, and even get back some of the time you lost during creaming)! Instead of slowly scooping bit by bit of your dry ingredients into the bowl (ho hum), you should actually be dumping the whole thing in at once. That's right, just stop your machine and dump it right on in. The time you save doing this is actually the time you save the gluten from over producing and giving you gummy cupcakes, yuck! *Just make sure you don't turn your mixer on high right out of the shoot or you will be wearing it!

Other quick tips...then onto the cupcakes: 1) once you mix the batter, its okay for it to sit out for a little while if you are baking in batches...it doesn't all need to be poured at once. 2) crack all your eggs into a bowl and beat them before adding to the batter (just use your eye to add "one" egg at a time) 3) speaking of cracking, do you know you get a better break if you crack right on the counter surface vs. a bowl? 4) you can substitute out vanilla for any flavor imaginable in you basic vanilla cake and frosting, even alcohol (just be conscious of the ratios). Armed with all the tips and tools I needed, I was off to the races. Let the baking begin!

A snowball of sugar, yum!

Fresh edible flowers really make these pop!

Ohhh, Ahhh...

Saturday, September 13, 2008

Sunflower Sunshine Cookies


Who knew sunflower butter could be so, YUM?
I was  a bit skeptical about giving this cookie of an experiment a try, but in the constant pursuit of a "better for you" treat I was lead down a very different path.  You see, these cookies stem from what I call 6 degrees of 'inspiration' (from my cookie that is)!
It all started with my girlfriend who is robbed of the deliciousness that is anything and everything baked with flour or gluten, so I knew these had to be gluten free.  This my friends, is a serious task. In my baking heart, I knew I was not yet ready to get involved with the alternative flour mixing magic that is a safe, gluten free blend...so I decided my little treat had to simply not include gluten at all. Well, if you have tried this before, you know that it pretty much leaves you with peanut butter cookies and macaroons.  So, armed with my basic peanut butter cookie recipe and a new carton of eggs, I was set to dig in to my Kitchen Aid mixer right when I arrived home from work.

But, where's the 6 degree twist you ask? Here it comes...

As I was ready to leave the office, groceries in tow, a girlfriend of mine was arriving back from the allergist..."allergic to peanuts". Seeing the desperate heartache in here eyes I knew I had to cheer her up through sugar on her tastebuds ASAP. My mission: these cookies now had to be nut free too, but how? Cue sunflower butter!
Many more degrees of inspiration came from aisle 6 at the local Whole Foods and before I knew it I was cutting and creating at top speed. The end result was delicious if not magnificent.  Not to mention the ridiculous amount of nutritional benefits sunflower butter has to offer, who knew?! 
So here they are...a little good for you, a little bad, a little sweet, a little salty...'little' however, does not preclude their wondrous flavor.

Ingredients
2 cups sunflower butter (stirred)
2 cups light brown sugar (optional - 2 cups white sugar and add 1 tsp molasses)
2 eggs (beaten) 
1 teaspoon vanilla extract
Pinch of cinnamon
2 teaspoon baking soda
Pinch of salt
1 cup granulated sugar (on the side to roll dough in)

Recipe
1. Preheat oven to 350 degrees
2. In a mixing bowl, combine sunflower butter, sugar and beaten eggs until combined
3. Add vanilla, cinnamon, baking soda and salt
4. Mix well
5. Roll dough into 1 inch balls, and dip into granulated sugar
6. Place balls on foil/parchment paper lined baking sheet (if dough is too sticky, refrigerate for 30 minutes)
7. Using a fork, press balls slightly to make a classic crisscross pattern on the top
8. Bake for 9-10 minutes (until light brown)
9. Cool cookies on pan for 5 minutes before removing to cooling rack
10. Store in refrigerator, they will go bad if left at room temperature 
11. EAT!
*Makes 2 dozen

Wednesday, August 27, 2008

Operation Quick Bread Cookies

They say that home is where the heart is, and sweets are baked with love.  This morning, I found that to be my motto of the day as I stirred, mixed and scooped my way to the perfect cookie.  You see, today was my first official bake off with Operation Baking Gals  and I was baking for Staff Sergeant Daryl and his US Air Force team, so I wanted everything to be perfect. All I could think about is making a cookie that exemplified my heart and support for our troops in Iraq and the hope that the second they untied the meticulously wrapped brown paper box, I could feel the smiles from across the ocean.  

Backed with the support of my team, Hungry Fox, I grabbed my oven mitts, armed my self with my favorite Pottery Barn green spatula and hit the oven running. Today I decided that I would make something a little different than the average cookie, something fresh and light to get them through those hot summer days in the Iraq sunshine...this led me to a simple but tasty recipe I have had stacked in my recipe pile for ages from the Pillsbury website. With a few modifications, I think I have created the perfect, yet refreshing, cookie that will no doubt fill the bellies of our soldiers and  pile on the smiles. 


Cran-Orange Quick Bread Cookies

Ingredients
1 package Pilsburry Cranberry Quick Bread and Muffin Mix
3/4 cup quick cooking rolled oats
1/2 cup coconut
1/2 cup sweetend dried cranberries
1/2 teaspoon grated orange peel
1/2 cup oil (I use a little less than 1/2c.)
1 tablespoon orange juice
2 eggs

Recipe
1. preheat oven to 350 degrees
2. In a large bowl/standing mixer, combine quick bread mix, oats, coconut, cranberries and orange peel. Mix well.
3. To dry mixture, add oil, orange juice and eggs. Mix well.
4. Drop by heaping teaspoons (I used a medium sized cookie spoon) onto an ungreased cookie sheet.
5. Bake 10-13 minutes
6. Cool on wire rack
7. If desired, frost with basic powdered sugar glaze:
- 1/2 cup powdered sugar
- enough juice squeezed straight from the orange to make a glaze
- spoon over top of cooled cookies
*Makes 2-3 dozen

Variations: You can really use any flavor of quick bread mix, from pumpkin to lemon, and adjust the add-ins, like walnuts for cranberries or lemon zest for orange.

*In loving memory of Army Spc. Chase R. Whitham*

Thursday, August 14, 2008

Gluten-Free Goodness

Oh YUM!

What more can I say...nothing says the end to a perfect weekend quite like a big retro bakery sign yelling at you from a crowded New York sidewalk. But then again, it didn't actually come upon me out of the blue. It came to me through my gluten-free goddess, Sarah.

Ever since I moved to New York City, she has been emailing me and sending me letters (yes, snail mail) about this amazing bake shop called Babycakes. But this is not just another cupcake shop gone Manhattan, this is a quaint little nook in the cranny of the Lower East Side. Babycakes prides itself on sweet baked goodness for the alternative spirit of the allergen tummy. Treats here are not only gluten-free, they are free of refined sugar and vegan (this sounds scary, but I promise you, its not).

These cupcakes are naturally sweetened with agave nectar and in the place of eggs and ultra bad for you butter, you will find heart healthy coconut oil. No artificial colors, no refined flour, no guilt...unless you eat 5, which we did. Nothing but goodness is left behind in these cupcakes. Not even my boyfriend and sweet tooth master could taste anything different about these delectable treats (well, we didn't necessarily tell him they were GOOD for you, that would ruin the fun, but you get the point). Just look at them...you too will never miss the processed sweets again. This is a one stop shop for the perfect cupcake.


When you are finished, top it all off with a quite stroll through China Town on the way home (to walk off the many treats that you will undoubtedly want to try) and you will have completed one perfectly delicious day in the Big Apple!

My Gluten-Free Girl!

Thursday, August 7, 2008

Operation Baking Gals

Today is a very special post, that is not about my recipes per say, but rather about making my recipes mean something to others. As I was surfing my daily baking blogs, I stumbled across a blog...rather a movement...that is getting together to bake cookies and treats for our soldiers overseas called Operation Baking Gals. Instantly, I was drawn in knowing I had found my calling to put my oven to work in the most positive way.

Having lost my best friend Chase in Iraq in back in 2004, I found this the perfect way to honor his memory, and to combine my passion of baking, to help support all of our men and women out there that go through so much everyday just to stand up for what we believe in. I want them all to know we thank them and applaude them...and what a better way to send love than in a homemade chocolate chip cookie?

A little more on Operation Baking Gals...Operation Baking GALS will be supporting our troops every month, once a month, and instead of our soldiers getting deodorant and soap, they'll be getting the one thing they can't get from the canteen - Homemade goodies made with LOVE. They will be assigning a different soldier to certain sub-groups of bakers each month so that we spread the love, and that way, a homesick troop will have a package with HIS name on it, filled with goodies to share. Now, does that not sound like one amazing movement?! I am so honored to be a part of this and if you would like to get involved too, please go visit Susan's website linked above.

I will keep you updated via my postings and share all the goodness I will be sending over too.

What a treat.

Friday, July 25, 2008

Breakfast Cookies


Contrary to the name of these cookies, they are quite far from a nutritionally sound breakfast! These breakfast cookies are formally known as Farm Cookies, a recipe my friends mother Sheila was so kind as to give me once we tried them during vacation at her house in South Carolina. The name has since morphed from her cookies into mine because of one small story that includes my boyfriend thinking that if you add "breakfast" in front of a dessert, it then becomes perfectly good to eat at 4:30 in the morning.
These make a lot, so make sure you share!

Ingredients
1 cup butter (at room temp)
1 cup sugar
1 cup brown sugar
2 eggs
1 tsp vanilla
2 cups flour
1 tsp baking soda
1 tsp salt
1 tsp baking powder
2 cups frosted flakes
2 cups oatmeal
1 cup coconut
1 cup pecans or walnuts

Recipe
1. Preheat oven to 425 (ovens vary, so test from 400-425)
2. In a mixing bowl, cream together butter, sugar, brown sugar, eggs and vanilla until pale in color and totally blended
3. In a separate bowl sift together flour, baking soda, salt and baking powder
4. Blend in the dry ingredients in to the wet until fully incorporated
5. Last, carefully mix in the Frosted Flakes, oatmeal, coconut and nuts until just combined (be carful not to crush the cereal)
6. Roll dough into balls (or use a medium size cookie spoon) and press down to slightly flatten the dough
7. Bake for about 7-8 minutes, until golden brown
8. Cool on wire rack and enjoy them as fast as you can!
*Makes 4 1/2 dozen

Thursday, July 17, 2008

Yummy banana bread perfection


When over at my sisters house the other day I noticed three, very brown, bananas sitting on her counter waiting to go out to the trash. Sweeping in to save the day, I grabbed the bananas and ran for my oven thinking, banana bread. Its not very often that I actually make banana bread because I can't be patient enough to wait for perfectly good bananas to go bad! But today I reveled in the rotten bananas and made the yummiest loaf of banana bread out there.

A few secrets to share with you first: 1) Never over mix your batter, that will just lead to tough glue like bread, not goodness. Stir just enough to barely combine (we are talking 8-10 go-rounds here), its fine if there are still lumps or some dry ingredient spots. 2) always tent your bread with foil when 30 minutes remain on the baking time. 3) Fresh nutmeg. I cant stress this enough...any recipe you use that calls for nutmeg, grate it fresh. I just keep a jar in my pantry and zest when needed! 4) REAL vanilla...for any and everything you do. Vanilla extract is the sin of the kitchen. 5) Eat and enjoy.

Ingredients
1 cup pecans (this is optional if your not a nut lover)
1 3/4 cups all purpose flour
3/4 cup granulated white sugar
1 teaspoon baking powder
1/4 teaspoon baking soda
1/4 teaspoon salt
1 teaspoon ground cinnamon
1/4 teaspoon freshly ground nutmeg
1/2 cup unsalted butter (melt and cool)
2 large eggs
3 ripe large bananas (mashed up)
1 teaspoon pure vanilla

Recipe
Start by preheating the oven to 350 degrees and put the oven rack in the middle. Spray a medium loaf pan (around 9x5x3 inch) with non-stick spray.
Coarsely chop up the pecans, mash bananas and melt butter. Set aside.
In a large bowl sift together the following ingredients: flour, sugar, baking powder, baking soda, salt, cinnamon, nutmeg and nuts.
In a separate bowl combine the rest of the wet ingredients: melted butter, bananas, eggs and vanilla.
With a spatula, lightly fold (mix from top to bottom in a circle) the wet ingredients into the large bowl containing the dry ingredients (make sure you do not over mix here...again, 8-10 folds if you can). The batter will be thick and chunky, not smooth.
Pour the batter into your prepared pan, don't forget to scrape all the bits out of the bowl!
Bake until the bread is golden brown and a toothpick inserted into the center comes out clean, about 55-60 minutes (but start checking around 45...everyones oven is different).
Let cool in pan for 15 minutes on a wire rack, then remove bread from pan to continue cooling on the rack.
Enjoy warm or at room temp. Makes 1 medium loaf.

Friday, June 20, 2008

An Effort At Interesting...baking

While skimming a Russel Davies article on how to be interesting I discovered that in order to harness my inner creativity and take notice on all that is around me I must blog...blog about paying attention...which to me, florishes in baking. As Russell says, "you must be interested in order to be interesting". So this blog marks my quest to become interested (in my oven) and see if in turn, I thus become interesting. Come along for the experiment, the observation and the mindless need to seek out what is interesting in the kitchen. Listen to me as I try to listen to whats going on around me from an average girls culinary perspective...as I try to become 'interested'.